
Restoring the console wood panel and gear selector plate
John Powell's fix for a cracked console veneer and broken automatic selector plate, with a warning about the workshop manual.
Updated 24 October 2026
By the late John Powell, from his 1976 Mk2 automatic, April 2018.
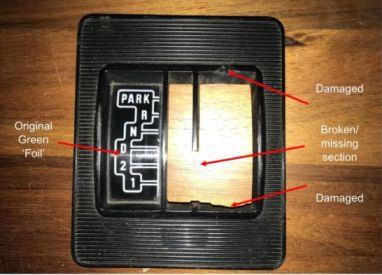
With the carpet out, John found the classic Mk2 console problems: the veneer on the wood panel split and lifting through the lacquer, the switches faded white, and the plastic gear selector plate broken and loose.
The manual is wrong here
For the console (operation 76.25.0), the Repair and Operation Manual says to prise out the gear selector gate panel on automatics. Don't. It's held by two screws or clamps from underneath, and prising it only breaks it, which is how John's previous owner damaged his. Leave it in place until the whole wood panel is out, then undo it from below.
The rest of the manual's order is fine: isolate the battery, remove the selector knob and collar, prise out the window switches and unplug them, prise out the interior light switch (draw a diagram of its wires first; see interior light wiring), then the console front panel.
The selector plate
John bought a new plate from Rimmer Bros, but it comes without the green "foil" indicator insert. He cut the green insert out of the old plate with a Dremel and fitted it to the new one.
The wood panel
The lacquer is very thin and the veneer thinner, over 5-ply. Don't try to sand it: you'll be through the veneer straight away.
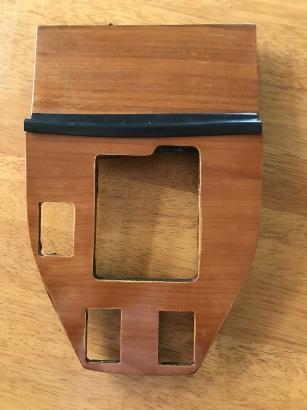
Instead, John took the panel and the matching one from the other side to a local cabinetmaker (Cobram Kitchens and Cabinets). Laminex Cherry, in a matt finish, was a close match. They machined a piece down to 1 mm, cut it to the exact shape using the original panel as a template, holes and all, and bonded it on, for about $50. Ask for at least three offcuts while you're there for colour tests. The grain runs across the panel.
Matching the colour
On advice from Tom, a retired carpenter in his club, John tinted the finish rather than the Laminex. You'll need ESP (Easy Surface Prep, a bonding agent), Estapol Satin, Wattyl stain in New Maple, and thinners, as Estapol on its own went on thick and lumpy.
- Clean the Laminex and apply ESP as the tin says.
- In a small measuring cup, mix about 80 ml of Estapol with about 10 ml of thinners.
- Add 3 drops of stain, mix for 30 seconds, and paint the first offcut.
- Add another 3 drops for the second offcut, and 3 more for the third.
- Leave them at least 8 hours and compare with the other panel.
- Apply your chosen mix to the panel and leave it 24 hours between coats.
John's first coat at 6 drops was a bit light, so he added a second coat at 8 drops and a third, darker coat after that. Satin matches the original's low sheen; if you want more shine, cut and polish it, but only once there are at least two stained coats, or you may polish through.
Done this, or found a better match? Tell us in Tech Q&A.
Comments
Nothing yet.